My first attempts at making things from bone

Spoon - Cow bone
the decoration was done with a needle file
the dye is actually tan leather dye, all I had on hand

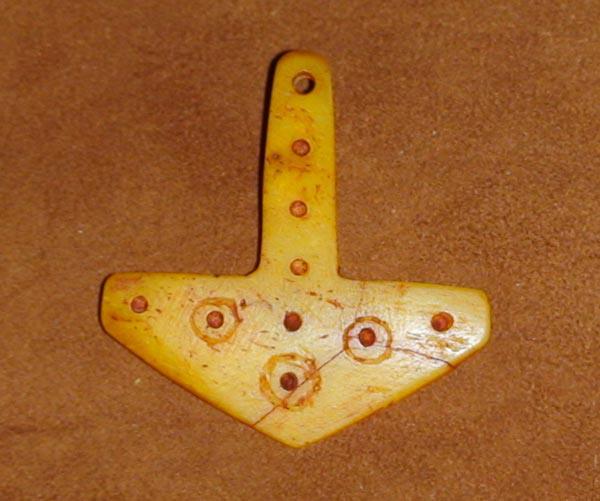
 Thor's Hammer - Cow bone
The bone broke when I tried to stamp the circles, so I had to glue this one back together. Dyed with tan leather dye just for fun.
Thor's Hammer - Cow bone
The bone broke when I tried to stamp the circles, so I had to glue this one back together. Dyed with tan leather dye just for fun.
 Tooth shaped bead - Cow bone
Just a scrap I played with.
Dyed with tan leather dye.
Tooth shaped bead - Cow bone
Just a scrap I played with.
Dyed with tan leather dye.
 Some quick dice I made out of small cut offs - Cow bone
 Small cylindrical beads - Cow bone
 A pin - Cow bone
Started out a lot thicker than it was, and I tried to do a spiral on the needle part... didn't work so well, thus, thinner pin
A pin - Cow bone
Started out a lot thicker than it was, and I tried to do a spiral on the needle part... didn't work so well, thus, thinner pin
 Belt end - Cow Bone
Tried a bit of relief carving using my dremel
Need smaller bits for more detailed work
but okay for a first time carve, I guess
Dyed with tan leather dye.
Belt end - Cow Bone
Tried a bit of relief carving using my dremel
Need smaller bits for more detailed work
but okay for a first time carve, I guess
Dyed with tan leather dye.
 WIP Comb - Cow bone
The nails are just to hold it in place for now.
I made the middle section with the teeth first, but closer examination of some period combs suggest they were assembled first and cut after... Still lots of work to do on this one
WIP Comb - Cow bone
The nails are just to hold it in place for now.
I made the middle section with the teeth first, but closer examination of some period combs suggest they were assembled first and cut after... Still lots of work to do on this one
 Other side of comb. Those scratches were the first attempt I made at engraving bone with a dental tool... tedious, need sharper hand tools, or stick with a file and/or dremel tool for now I think
 Belt Buckle - Cow bone
Did a bit better on the relief carving with this one. New bits and faster speed worked much, much better.
Belt Buckle - Cow bone
Did a bit better on the relief carving with this one. New bits and faster speed worked much, much better.
 Belt Buckle - Cow bone
A little higher contrast on this one to make the carving more visible.
Belt Buckle - Cow bone
A little higher contrast on this one to make the carving more visible.
 Pin #2 - Cow bone
Started out trying to replicate a pin, but it didn't quite work. Still turned out okay though.
It's difficult to photograph bone to get all the details to show up!
Pin #2 - Cow bone
Started out trying to replicate a pin, but it didn't quite work. Still turned out okay though.
It's difficult to photograph bone to get all the details to show up!
 Serpent - Cow bone
Taken from a rune stone. Lots of open areas that had to be cleared on this one. Still pretty rough, but not bad for my first try of something like this. Still a ways to go to get everything smooth and rounded so it polishes nice. This will be a good benchmark piece for me to look back on once I get really good (I hope, anyway wink emoticon
Serpent - Cow bone
Taken from a rune stone. Lots of open areas that had to be cleared on this one. Still pretty rough, but not bad for my first try of something like this. Still a ways to go to get everything smooth and rounded so it polishes nice. This will be a good benchmark piece for me to look back on once I get really good (I hope, anyway wink emoticon
 Comb - Cow bone
Assembled, with one pin in place, and some decorative lines. Still need to add a ring to the end for hanging.
Comb - Cow bone
Assembled, with one pin. The second pin cracked the bone, if you look closely you might be able to see it on the left side, so for this experiment I opted to glue it, and will add a ring to the left hole to hang it from. Everything's a learning process.
 Spoon Commission - Cow bone - Back side
WIP second spoon, slightly larger than the first one.
Spoon Commission - Cow bone - Back side
WIP second spoon, slightly larger than the first one.
 Spoon Commission - Cow bone - Back side
WIP second spoon, slightly larger than the first one.
Slightly larger 'spoon' area, but still pretty flat. As with the first one, just followed the contour of the bone.
Spoon Commission - Cow bone - Back side
WIP second spoon, slightly larger than the first one.
Slightly larger 'spoon' area, but still pretty flat. As with the first one, just followed the contour of the bone.

Spoon Commission - Cow bone - front side
Added a little celtic knot.
Spoon Commission - Cow bone - front side
Close up of celtic knot.
I had to fiddle with the colour etc. in photoshop to make it stand out. Doesn't really do it justice though. Looks much better in person.